
Hockey Shooting Drills at Home: A Complete Guide
Table of Contents
- Hockey Shooting Drills at Home: What You Need Before You Start
- Off-Ice Hockey Shooting Drills for Every Skill Level
- Hockey Shooting Drills for Beginners: Building the Foundation
- Stickhandling and Puck Control Drills to Pair With Shooting
- Your Hockey Shooting Practice Routine: A Weekly Plan
- Hockey Training Equipment for Shooting: What to Use and Why
- Measuring Progress and Avoiding Common Mistakes
- Frequently Asked Questions
Last Updated: October 6, 2026
Hockey Shooting Drills at Home: What You Need Before You Start
A driveway or garage, a shooting pad, and 20 focused minutes a day can build a harder shot than most players get from team practice alone.
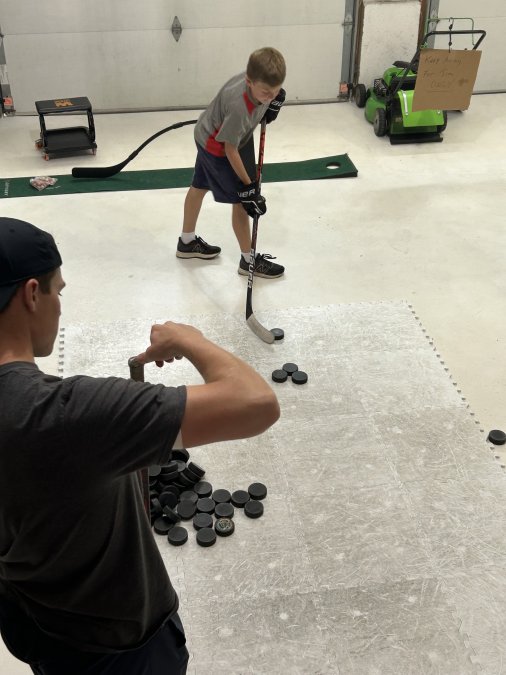
The key is doing it right, poor setup and sloppy habits can slow a player down instead of speeding them up.
Below, we break down the drills, schedule, and gear that turn a driveway into a real training space.
Choosing Your Off-Ice Surface and Safe Setup
The right surface makes every rep feel like the ice. A shooting pad lets the puck glide instead of catching on concrete.
Safety comes first. Before a single puck flies, check your space:
- Keep a clear zone behind the net so pucks do not hit windows, cars, or people
- Wear a helmet and gloves every session, even in the driveway
- Set up on a flat, dry surface to avoid slips
- Aim away from streets and sidewalks
A garage, a fenced backyard, or a driveway with a backstop all work well. For more on safe off-ice play, see the USA Hockey player development resources.
Equipment Checklist for Home Practice
A few basics cover almost every drill.
- A hockey stick, cut to the right length for the player
- A shooting pad or smooth board for puck glide
- A net, or a target board with marked corners
- A dozen pucks, so you are not chasing one at a time
Off-Ice Hockey Shooting Drills for Every Skill Level
Every shot starts with the same building blocks: weight transfer, a quick release, and follow-through. These off-ice hockey shooting drills train those habits without ice.
Wrist Shot, Snap Shot, Slap Shot, and Backhand Progressions
The snap shot is next, and the goal is speed: pull the puck back a short distance and fire quickly.
The slap shot adds power: wind up, strike the ice just behind the puck, and drive through it.
The backhand rounds out the set, hardest to master, most surprising to a goalie. Flip the puck off the back of the blade with a firm wrist snap.
|
Drill |
Space Needed |
Skill Focus |
Best For |
|---|---|---|---|
|
Wrist shot |
Low |
Accuracy, release |
Beginners |
|
Snap shot |
Low |
Quick release |
All levels |
|
Slap shot |
High |
Raw power |
Older players |
|
Backhand |
Low |
Control, surprise |
Intermediate+ |
Hockey Shooting Drills for Beginners: Building the Foundation
Hockey shooting drills for beginners should focus on form, not power. A young player who learns to transfer weight and follow through will outshoot a stronger player with bad habits. The first month's goal is a repeatable motion you can trust under pressure.
The four technique cues that matter most
Every shot below is built on the same four cues. Teach them in this order, and add power only once all four feel automatic.
- Weight transfer. Start with weight on the back (inside) foot, then push it to the front foot as the puck moves forward. Most beginners keep weight on the back foot the whole time, which kills power and accuracy.
- Puck position. The puck should sit on the middle of the blade, not the heel or the toe. Too far back and the shot flutters; too far forward and you lose control.
- Release point. The puck leaves the blade just past the front foot, not beside it. Releasing too early sends the puck wide; too late sends it into the ice.
- Follow-through. The blade should finish pointing at your target, roughly waist-high on a wrist shot. A short, choppy follow-through is the most common reason a beginner's shot is weak and inaccurate.
Common beginner mistakes and how to fix them
- Slapping at the puck instead of sweeping it. Fix: slow the motion down and drag the puck along the blade before releasing.
- Standing straight up through the shot. Fix: stay low, with knees bent, and finish with your chest over your front knee.
- Looking at the puck instead of the target. Fix: pick a corner before you shoot, and keep your eyes there through the follow-through.
- Gripping the stick too tight with the top hand. Fix: the top hand steers, the bottom hand supplies power. Relax the top hand.
The beginner progression (weeks 1-4)
Run this progression three times a week for 10-15 minutes. Stop when form breaks down, tired reps teach tired habits.
Week 1, Stationary wrist shots. Set up 10 pucks in a line, about two feet apart.
Week 2, Moving wrist shots. Same setup, but take one stride between pucks.
Week 4, Accuracy targets. Tape four targets in the corners of your net or target board.
Lamplighter Hockey Stick Weight (available in 3 sizes) →
Adapting for age and space
- 8U and Mites: Use a lighter stick and a ball or lightweight puck. Keep sessions to 8-10 minutes and make it a game, count targets hit out of 10.
- 10U-12U: Full progression above, with a real puck on a shooting pad. Add a backhand rep every third shot.
- Small spaces (basement, hallway): Use a foam or lightweight ball, a short stick, and a target board instead of a net. No slap shots indoors.
- Players who cannot shoot full power indoors: Focus on release speed and accuracy with a ball, and save full-power work for the driveway or yard.
Stickhandling and Puck Control Drills to Pair With Shooting
Shooting without puck control is like a car with no steering. Stickhandling drills teach your hands to move the puck where you want it before you shoot.
Try these:
- Figure-eight drill: Weave the puck in a figure eight around two objects
- Four-corner drill: Move the puck to four spots around your body, head up
- Gate passing: Set two objects as a gate and pass the puck through it
- Head-up stickhandling: Handle the puck while looking at a target, not your hands
Pair each stickhandling set with shooting reps. Handle for 30 seconds, then shoot. This trains the transition from control to release.
Your Hockey Shooting Practice Routine: A Weekly Plan
A hockey shooting practice routine works best short and repeatable. Consistency beats intensity.
|
Day |
Focus |
Time |
|---|---|---|
|
Monday |
Wrist shots, 50 reps |
15 min |
|
Tuesday |
Stickhandling and snap shots |
15 min |
|
Wednesday |
Rest |
- |
|
Thursday |
Backhand and accuracy targets |
15 min |
|
Friday |
Slap shots (outdoor space) |
20 min |
|
Saturday |
Full drill circuit with stick weight |
25 min |
|
Sunday |
Rest |
- |
Hockey Training Equipment for Shooting: What to Use and Why
Hockey training equipment for shooting falls into two groups: gear that builds skill and gear that builds strength. Skill gear includes a shooting pad, pucks, and a net or target.
This is where a stick weight earns its place. The Lamplighter Hockey Stick Weight slides inside your own stick and adds resistance to every rep, in three sizes: 1/2 pound for 8U and Mites, 1 pound for all ages, and 2 pound for stronger players 13 and up.
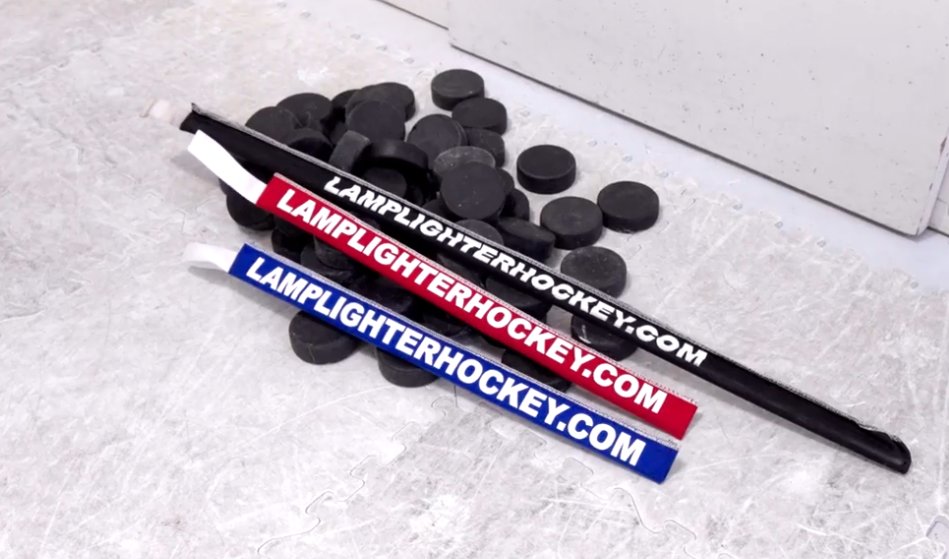
It fits most junior, intermediate, and senior sticks with no tape or tools. Players warm up and train with it, then pull it out for games and feel the difference.
Measuring Progress and Avoiding Common Mistakes
Repetition counts alone do not tell you if you are improving, a player can take 500 shots a week and get worse if the reps reinforce bad habits. Steady improvers track the right things and fix the weakest one first.
A simple progress log that actually works
Keep a notebook or phone note with five fields, filled out once a week.
- Shots on target out of 20. Take 20 shots at a target and count hits. This is your accuracy baseline.
- Release time. Use a phone timer or a partner with a stopwatch. Start the clock when the puck touches your blade and stop it when the puck hits the net. Most beginners are over one second; skilled players get under half a second.
- Weak-side percentage. Count how many backhand shots hit the target out of 10. Most players never track this, and it is usually their worst number.
- Consistency score. Take 10 shots and rate each one 1-5 for how clean it felt. Add them up. A score that climbs week to week means the motion is becoming repeatable.
How to read the numbers
- If accuracy is flat but release time is dropping, you are getting faster but not more precise. Add target work.
- If accuracy is climbing but release time is flat, you are getting more precise but not quicker. Add snap-shot reps.
- If weak-side percentage is stuck below 30%, you are neglecting the backhand. Give it its own session.
- If consistency score drops when you add weight, the weight is too heavy. Drop back a size.
Common mistakes to avoid
- Chasing power before form. Bad mechanics get worse under load. Fix the motion first, then add resistance.
- Skipping the follow-through. The shot ends at the target, not at the puck. A short follow-through is the most common cause of a weak, inaccurate shot.
- Training tired. Tired reps teach tired habits. Stop when form breaks down.
- Ignoring one side. Most players never practice the backhand, and it shows up in games.
Surface and equipment trade-offs
Where you shoot changes how the puck behaves, and that changes what you can practice.
- Shooting pad (smooth plastic sheet): Best all-around surface. The puck glides like it does on ice, so wrist shots, snap shots, and backhands all translate well. Keep it clean and out of direct sun.
- Synthetic ice: Closest feel to real ice and durable outdoors, but it costs more and needs a flat base. Best for the most realistic glide.
- Concrete or asphalt: Free and always available, but pucks catch and skip, which ruins release timing. Use a shooting pad on top, or switch to a ball for stickhandling only.
- Garage floor: Usually smooth enough for a pad, and walls give you a natural backstop. Watch for cars and overhead doors.
- Basement or hallway: Use a foam or lightweight ball and a target board. No slap shots indoors.
One customer told us the stick weight "greatly improved my son's (age 15) shot since he began training with it." Another shared that their daughter "won the hardest shot" after training. Results like these come from steady, tracked work, not one big session.
For more on skill development stages, see the USA Hockey American Development Model.
Frequently Asked Questions
What equipment do I need for at-home hockey shooting drills?
You need a hockey stick, a shooting pad or smooth surface, pucks (or street hockey balls), and a net or target. A stick weight like the Lamplighter Hockey Stick Weight ($45.00) adds resistance to build strength. For safety, wear gloves and a helmet. If space is tight, use a rebounder or a tarp with targets.
How often should I practice hockey shooting at home?
Aim for 4-5 short sessions per week, 20-30 minutes each. Consistency beats marathon sessions. Start with 50-100 shots focusing on technique, then increase volume as you improve. A weekly routine might include two technique days, two power days, and one stickhandling day. Adjust based on age and energy levels.
Can I practice hockey shots indoors without damaging anything?
Yes, with the right setup. Use a shooting pad or a piece of carpet to protect floors, and soft pucks or street hockey balls to reduce noise and impact. Avoid slap shots indoors unless you have a designated safe area. Always check for breakable items and use a net or target to catch pucks.
How can I improve my hockey shot without ice?
Focus on off-ice shooting drills that reinforce technique: wrist shots, snap shots, and backhands. Use a stick weight to build strength, and practice on a smooth surface to simulate puck glide. Film your shot to check form, and set specific goals like hitting targets. Consistent practice 3-4 times a week yields noticeable gains in 6-8 weeks.